Cách đo puly định thời HTDĐo kích thước ròng rọc hiện có từ cả hai phía và lưu giữ thông tin về dây đai khớp nối.
Quyết định này kiểm soát những gì?
Đo kích thước puly hiện có từ cả hai phía và giữ lại thông tin về dây đai ghép nối. Quyết định này cần được ghi lại kèm theo ký hiệu dây đai, mã sản phẩm hoặc bản vẽ vì puly định thời là một phần của hệ thống truyền động. Việc so sánh bằng mắt thường không chứng minh được sự tương thích về răng hoặc độ khít của trục.
Quy trình làm việc được đề xuất
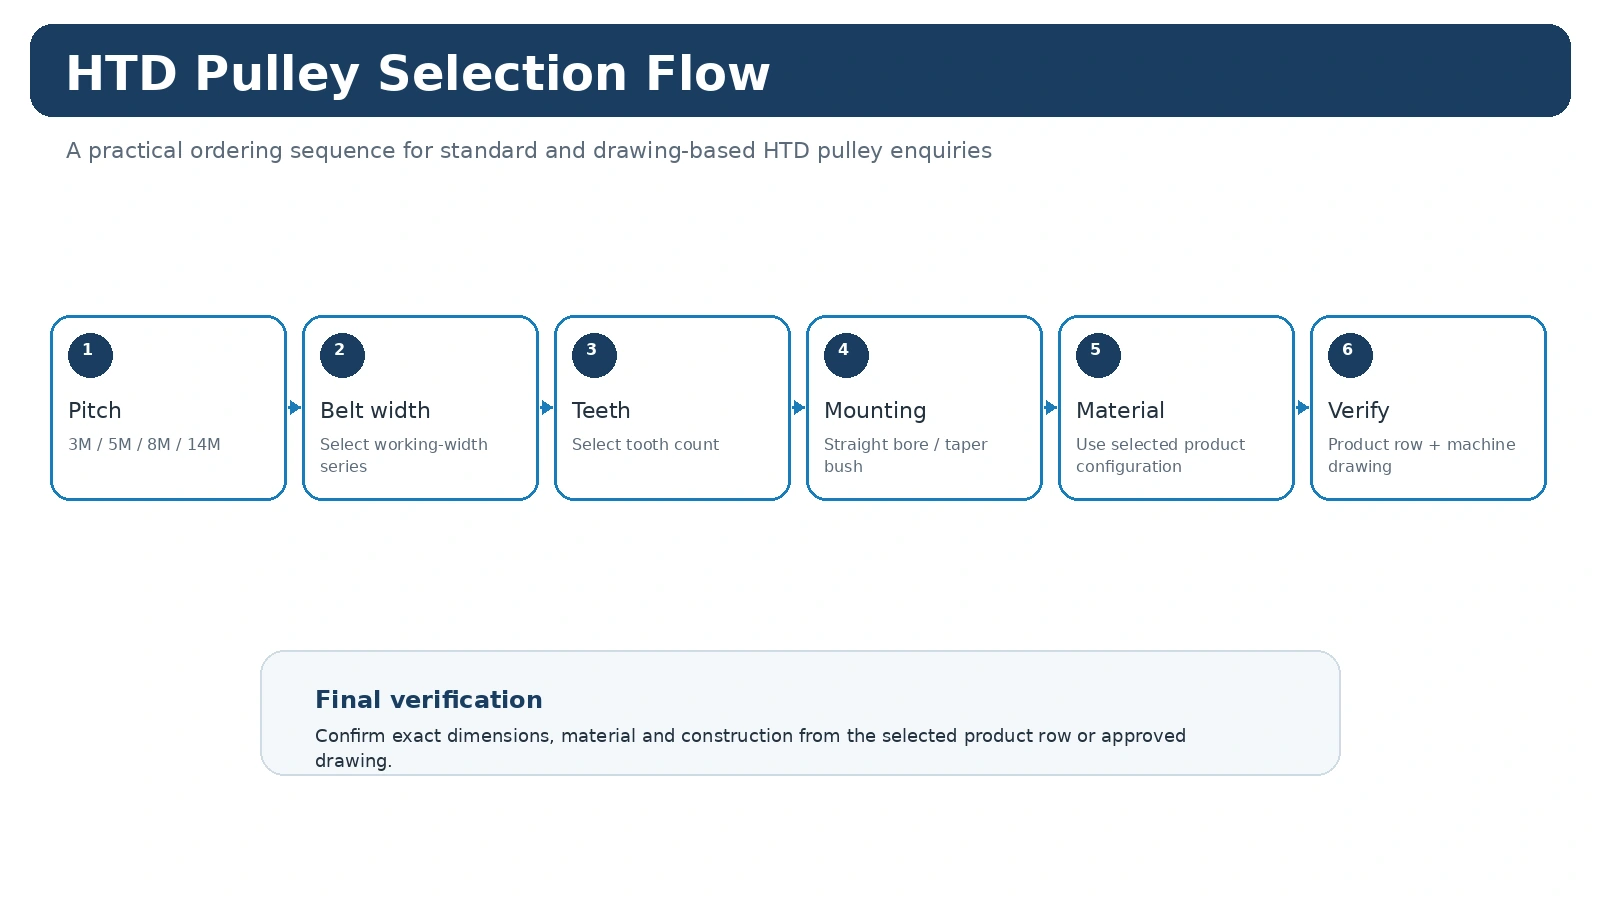
Bắt đầu bằng việc xác định yêu cầu về đai truyền động và khớp nối. Xác nhận bước/hình dạng răng, số răng và chiều rộng làm việc. Sau đó kiểm tra giao diện trục, bao bọc moayơ và mặt bích, vật liệu và bất kỳ yêu cầu kiểm tra nào được kiểm soát. Đối với việc thay thế, đo chi tiết cũ từ cả hai phía và ghi lại đường đai so với một điểm chuẩn ổn định trên máy.
Những lỗi thường gặp cần tránh
- Lựa chọn dựa trên đường kính ngoài mà không xét đến hệ thống răng.
- Giả sử rằng mọi biên dạng cong có cùng bước ren danh nghĩa đều có thể thay thế cho nhau.
- Chỉ đo một phía và bỏ sót phần nhô ra của trục bánh xe hoặc đường đai bị lệch.
- Sẽ để lại các yêu cầu về độ khít lỗ, rãnh then, mã bạc lót hoặc kiểm tra cho đến sau khi báo giá.
- Sử dụng giá trị độ căng hoặc dung sai dây đai chung mà không dựa trên thiết kế máy móc và dây đai.
Sử dụng hướng dẫn này trong yêu cầu báo giá (RFQ).
Sau khi thu thập được các biến chính, hãy mở... Các dòng sản phẩm HTDso sánh các yếu tố liên quan ngữ cảnh ứng dụngHoặc gửi bản vẽ và chi tiết đơn đặt hàng qua biểu mẫu bên dưới.
Hãy đo mối quan hệ lắp đặt trước khi đo phần rời.
Ảnh chụp và kích thước được thực hiện trước khi tháo rời giúp bảo đảm vị trí đường đai, hướng trục và khoảng hở xung quanh. Ghi lại các phép đo trực tiếp tại hiện trường riêng biệt với các giá trị được sao chép từ danh mục hoặc bản vẽ.
Không được đổi tên phép đo đường kính ngoài có thể truy cập được thành đường kính bước ren. Hãy sử dụng ký hiệu trong danh mục và bản vẽ kết cấu để diễn giải từng giá trị, và chuyển bất kỳ đặc điểm nào chưa được xác nhận thành câu hỏi yêu cầu báo giá rõ ràng.
Đo lường theo thứ tự sao cho vẫn giữ nguyên đặc tính sản phẩm.
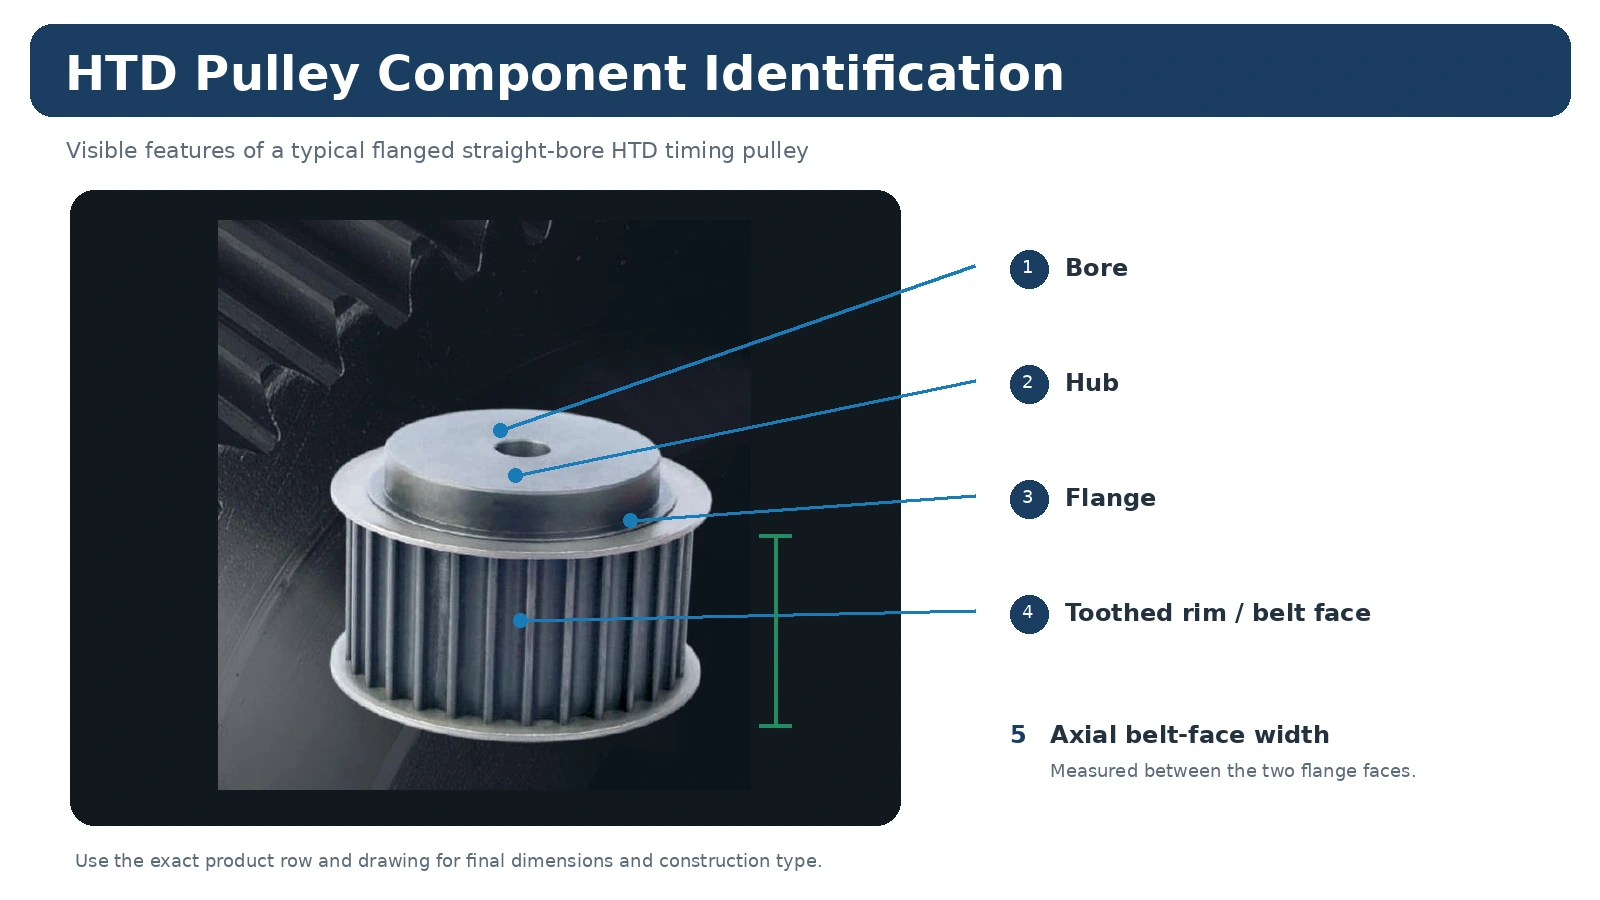
Ghi lại ký hiệu đai và số răng trước khi đo đường kính. Đo diện tích bề mặt làm việc, khoảng cách giữa hai mặt bích, cả hai phần nhô ra của moayơ và mặt tiếp xúc của trục. Ghi nhãn các giá trị đo được cho đến khi xác nhận được ký hiệu chính xác trong danh mục.
Khi quyết định liên quan đến một máy móc hiện có, hãy tách biệt các số đo, giá trị trong danh mục và các yêu cầu dự án mới. Điều này giúp tránh việc một phép đo tại hiện trường bị coi là kích thước danh nghĩa hoặc một thay đổi mong muốn bị nhầm lẫn với một tính năng tiêu chuẩn của dòng sản phẩm.
Sử dụng cả hình vẽ và bảng biểu cùng nhau.
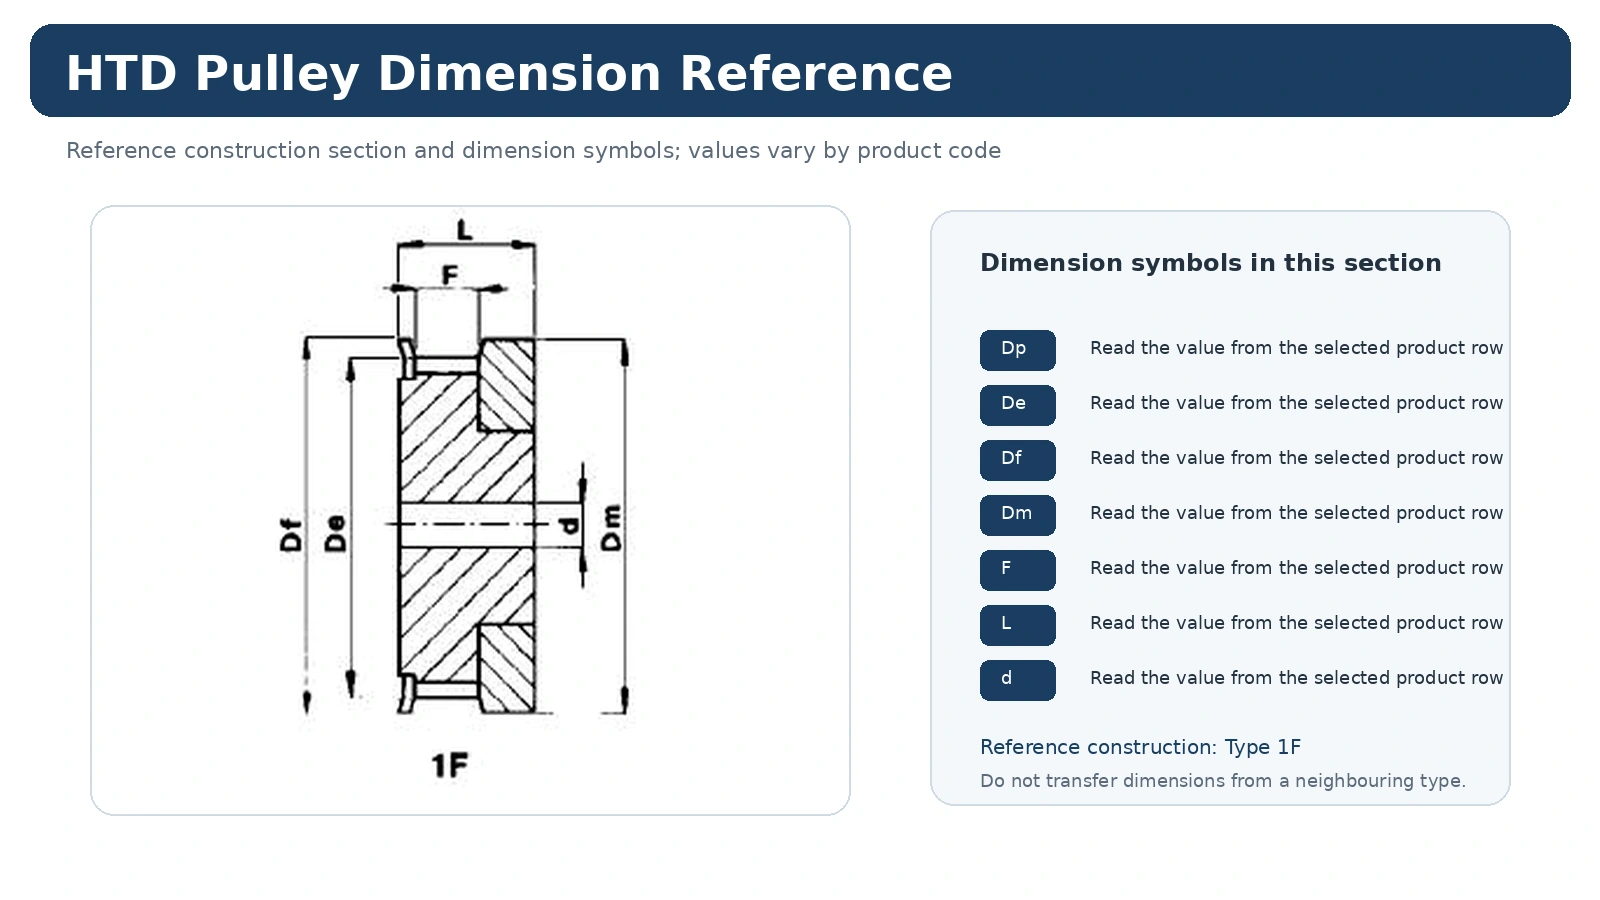
Bản vẽ thi công giải thích các ký hiệu và mối quan hệ giữa chúng. Bảng dữ liệu cụ thể cho từng hàng cung cấp các giá trị thực tế cho mô hình đã chọn. Không nên thu nhỏ hình minh họa hoặc chuyển kích thước từ chiều rộng hoặc số răng khác chỉ vì sản phẩm trông tương tự.
Trường hợp danh mục không quy định yêu cầu về độ vừa khít, độ lệch tâm, dung sai, độ hoàn thiện hoặc tài liệu, hãy ghi rõ yêu cầu đó trên bản vẽ dự án hoặc yêu cầu báo giá và đưa vào quy trình xem xét đơn đặt hàng.
Danh sách kiểm tra phát hành
Giữ nguyên thông tin về đai/hình dạng, chiều rộng làm việc, số răng, định nghĩa lắp đặt, số lượng và phiên bản bản vẽ trên cùng một dòng lệnh kỹ thuật. Thêm thông số vận hành máy cho bộ truyền động mới hoặc hình ảnh và số đo rõ ràng cho công việc thay thế. Điều này giúp bộ phận mua hàng có một cấu hình có thể được kiểm tra thay vì một tập hợp các kích thước rời rạc.
Những điều mà hướng dẫn này không thay thế
Hướng dẫn này giúp sắp xếp quy trình lựa chọn và đo lường; nó không thay thế cho dòng sản phẩm chính xác, dữ liệu dây đai hoặc bản vẽ dự án. Nếu công suất, mô-men xoắn, tốc độ, độ vừa khít, dung sai hoặc giới hạn dịch vụ yêu cầu không được nêu trong bảng danh mục liên quan hoặc bản vẽ đã được phê duyệt, hãy giữ nó như một thông tin đầu vào thiết kế hoặc yêu cầu báo giá và xác minh lại cho hệ thống truyền động thực tế.
Giới hạn đó rất hữu ích trong quá trình mua sắm vì nó ngăn chặn việc trích dẫn một lời giải thích kỹ thuật chung chung sau này như thể đó là một giá trị được đảm bảo cho mọi cấu hình ròng rọc HTD.
Áp dụng phép đo puly thay thế vào một máy thực tế
Thu thập các thông số như ký hiệu trên đai, số răng, diện tích bề mặt làm việc, đường kính lỗ/ống lót, độ nhô ra của moayơ, bố trí mặt bích và mốc chuẩn đường đai. Sử dụng catalog hoặc bản vẽ kích thước để đặt tên các chi tiết một cách nhất quán, sau đó tách các giá trị đo được trên máy khỏi các giá trị trong catalog. Nguyên tắc làm việc rất đơn giản: chụp ảnh cả hai mặt trước khi tháo để đảm bảo không bị mất hướng trục và khe hở giữa các bộ phận liền kề. Nếu bộ phận cũ bị mòn hoặc đã được sửa đổi, hãy coi các số đo của nó là dữ liệu thực tế chứ không phải là kích thước danh nghĩa ban đầu.
Đối với công việc thay thế, hãy so sánh mối quan hệ giữa trục trước và trục sau, đồng thời ghi chú mặt nào tạo nên đường đai. Đối với thiết kế mới, hãy ghi lại mối quan hệ tốc độ, khoảng cách tâm, công suất và phạm vi lắp đặt trước khi chọn mã sản phẩm. Điều này giúp dễ dàng truy vết lựa chọn khi bảo dưỡng hệ thống truyền động sau này.
Sử dụng bản vẽ để lấp đầy những khoảng trống còn lại.
Một dòng sản phẩm tiêu chuẩn có thể xác định kiểu bước răng, số răng và nhiều kích thước bao ngoài, nhưng các chi tiết cụ thể của dự án như khớp trục, chi tiết then chốt, thay đổi moayơ, lớp hoàn thiện hoặc giới hạn kiểm tra vẫn có thể yêu cầu bản vẽ. Hãy thể hiện điểm chuẩn của máy và các kích thước thực sự chi phối quá trình lắp ráp thay vì lấp đầy bản vẽ bằng các kích thước tham chiếu không được kiểm soát.
Nếu có hai cấu hình trong danh mục có vẻ khả thi, hãy xác định những gì vẫn chưa biết và đo trực tiếp đặc điểm đó. Cách này đáng tin cậy hơn so với việc chọn cấu hình có đường kính ngoài gần nhất hoặc hình ảnh quen thuộc nhất.
Phát hành dữ liệu để đo lường ròng rọc thay thế
Giữ nguyên thông tin nhận dạng sản phẩm đầy đủ cùng với dòng đơn hàng: dòng sản phẩm HTD, dòng chiều rộng, số răng, đường kính lỗ hoặc bạc lót, số lượng và phiên bản bản vẽ (nếu có). Thêm riêng các yêu cầu về vật liệu, hoàn thiện, kiểm tra hoặc tài liệu cụ thể của đơn hàng. Điều này giúp công việc thay thế sau này dễ dàng hơn vì cấu hình đã được chấp nhận có thể được khôi phục mà không cần phải xây dựng lại quyết định từ lịch sử email.
Hoàn tất phiếu ghi kích thước trước khi đặt hàng.
Một bản ghi thay thế hữu ích cần kết hợp ký hiệu trên đai với số răng, chiều rộng bề mặt đai, chiều rộng tổng thể, chi tiết lỗ hoặc bạc lót, độ nhô ra của trục ở cả hai phía và bố trí mặt bích. Không nên đo kích thước từ ảnh chụp hoặc ảnh chụp màn hình; hãy sử dụng giá trị trong catalogue in hoặc đo thực tế bằng phương pháp đã ghi chú. Trong trường hợp không gian hạn chế, hãy xác định kích thước nào được đo trực tiếp và kích thước nào vẫn cần xác nhận sau khi tháo rời. Điều này tránh việc biến phép đo gần đúng tại hiện trường thành thông số kỹ thuật khi mua hàng.